Looking Sharp
Well, I guess it is a good thing that I don't blog for a living...or I would be broke.
Since this is just a fun place for me to occasionally post the patterns up develope, I feel a lot less bad about not having posted in two years. Honestly, I have been working on this a cross-stitch baby blanket at the speed of a turtle. I think another four of my friends will have children before it is done.
This week I got in a mood and decided I wanted to make a birthday gift for a friend. At your Friendsmas party, she stole my cactus theme gift and was totally delighted with herself. So had an idea to crochet her a small cactus pillow. I searched for a little while online and wasn't willing to pay for a pattern and never really found what I was looking for. So, I found a cactus cross stitch pattern and decided I can turn this into a crochet pattern!
Low and behold I was right! You can turn a cross stitch pattern into a crochet pattern. First time I've ever tried something like that and overall I am not unhappy with how it turned out. Hop on over to the Patterns page for a free printable version of this pattern.
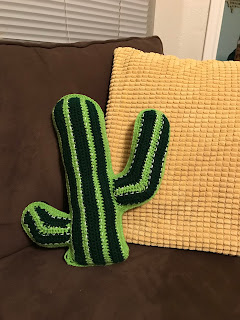


Cacti and succulents, in general, are super popular right now, and this little throw pillow makes a cute addition to any dorm or living. Be warned you may end up having to make more than one.
Please, please send me photos of your completed projects! Enjoy this free pattern, but don't be a prick. If you are going to repost or sell this item credit your source.
This project was a lot of fun who knows maybe I won't wait another two years before I post again.

Materials:
- Size G (4.25mm) hook
- Worsted Weight yarn (I used scrap yarn, I had less than a skein of lime green, green, black, & White)
- Yarn needle
- Polyfill
- Scissors
Abbreviations: CH - Chain
Sl st. - Slip stitch
SC - Single Crochet
SC2TOG - single crochet two together
Notes: I do not have details on the amount of yarn I used and did not note color changes. The only reason I created the stripes was that I thought I would run out of lime green. The color change pattern was two rows color A, then four rows color B.
This pattern is worked in two flat pieces then seamed together with single crochet.
Pattern
Body
Attach yarn to hook with slip knot, and chain 57. SC in the second stitch from hook and to end.
Row 1: SC all, CH 1 turn
Row 2: SC 56, SC twice in the last stitch, CH 1 turn (58 sts)
Row 3: SC all, CH 1 turn
Row 4: SC 57, SC twice in the last stitch, CH 1 turn (59 sts)
Row 5: SC all, CH 1 turn
Row 6: SC 58, SC twice in the last stitch, CH 1 turn (60 sts)
Row 7 - 13: SC all, CH 1 turn
Row 14: SC 58, SC2TOG (last two stitches in row), CH 1 turn (59 sts)
Row 15: SC all, CH 1 turn
Row 16: SC 57, SC2TOG, CH 1 turn (58 sts)
Row 17: SC all, CH 1 turn
Row 18: SC 56, SC2TOG, CH 1 turn (57 sts)
Row 19: SC all, cut, tie off
Arm #1
Count up 20 stitches on the side. Slip stitch into body to attach yarn. CH 42, SC in the second stitch from hook and to end.
Row 1: SC all, SL to attach arm #1 to body, CH 1, SL into next row up
Row 2: SC 8, SC2TOG (x3), SC to end, SC twice in last stitch, CH 1 turn
Row 3: SC all, SL to attach arm #1 to body, CH 1, SL into next row up
Row 4: SC 7, SC2TOG (x3), SC to end, SC twice in last stitch, CH 1 turn
Row 5: SC all, SL to attach arm #1 to body, CH 1, SL into next row up
Row 6: SC 6, SC2TOG (x3), SC to end, SC last two together, CH 1 turn
Row 7: SC all, SL to attach arm #1 to body, CH 1, SL into next row up
Row 8: SC 5, SC2tog (x2), SC last two together, CH 1 turn
Row 9: SC all, SL to attach arm #1 to body, CH 1, SL into next row up
SC around arm, attach to body, cut, tie off
 |
| What your cactus should look like before you SC around Arm #1 |
Arm #2
Count up 10 stitches on the other side. Slip stitch into body to attach yarn. CH 21, SC in the second stitch from hook and to end.
Row 1: SC all, SL to attach arm #1 to body, CH 1, SL into next row up
Row 2: SC 8, SC2TOG (x3), SC to end, SC twice in last stitch, CH 1 turn
Row 3: SC all, SL to attach arm #1 to body, CH 1, SL into next row up
Row 4: SC 6, SC2TOG (x3), SC to end, SC twice in last stitch, CH 1 turn
Row 5: SC all, SL to attach arm #1 to body, CH 1, SL into next row up
Row 6: SC 5, SC2TOG (x3), SC to end, SC last two together, CH 1 turn
Row 7: SC all, SL to attach arm #1 to body, CH 1, SL into next row up
Row 8: SC 5, SC2tog (x2), SC last two together, CH 1 turn
Row 9: SC all, SL to attach arm #1 to body, CH 1, SL into next row up
SC around arm, attach to body, cut, tie off.
Finishing Instructions
Attach yarn to bottom corner and SC around entire cactus to create an edge. (pictured left)
Make two. (Pictured right front green, back black)

If you want to add any detailing to your cactus now is the time. I used white yarn to add spines to mine. I have seen patterns where people add flowers or faces. So go ahead and fancy up your cactus!
Lay the pieces one on top of the other lining up the arms. Attach yarn to bottom corner. Use inner loops to SC the two pieces together. SC around pieces. Stuff cactus with polyfill as you go. SL into first SC to close the pillow. Cut, tie off, weave in end, and enjoy your new pillow!
 |
| Close up of SC seam |
Please, please send me photos of your completed projects! Enjoy this free pattern, but don't be a prick. If you are going to repost or sell this item credit your source.
This project was a lot of fun who knows maybe I won't wait another two years before I post again.


Comments
Post a Comment